Enabling Hyperliquid Portfolios
Katbot's live trading integration with Hyperliquid allows users to create and manage portfolios that execute leveraged perpetual trades on the Hyperliquid exchange in both Testnet and Mainnet. This guide covers how to set up and use Hyperliquid portfolios within the Katbot platform.
Note on terminology: In this guide, "agent" refers to your Hyperliquid agent wallet — a blockchain-level concept separate from Katbot's AI Agents. The Hyperliquid agent wallet is a signing key that authorizes trade orders on Hyperliquid on behalf of your master wallet. Katbot AI Agents (the recommendation engines you create on the Dashboard) are a different concept and are documented in the Agents guide.
It is recommended that you contact our support team for help when starting live trading. This guide provides an overview of how Hyperliquid integration works when live trading is enabled.
Live Trading Involves Risk
Please ensure you understand the risks before enabling live trading. Katbot is not responsible for any losses incurred through live trading for any reason. Review the terms and conditions carefully before proceeding.
How Hyperliquid Integration Works
When you create a Hyperliquid portfolio in Katbot, a guided wizard walks you through the entire setup process:
- You provide a portfolio name, choose Testnet or Mainnet, and select a Katbot AI Agent to power your trading recommendations.
- Katbot generates a dedicated agent wallet (or you can import your own). You approve this agent address on the Hyperliquid platform.
- You sign a one-time MetaMask message to approve the Katbot builder fee — a small automation fee charged per trade.
- Your portfolio is ready to trade.
The agent wallet is the key that allows Katbot to execute trades on your Hyperliquid account. It cannot withdraw funds or transfer assets — it can only place and manage trade orders within the permissions you grant.
Why Katbot Uses an Agent Key — and Why Your Key Never Touches Our Servers
Katbot is built around a core security principle: your private keys stay with you, always.
The Agent Security Model
Rather than asking you to hand over your main Hyperliquid wallet credentials, Katbot uses Hyperliquid's native API Agent system. Here is how the trust chain works:
- Your main wallet (connected via MetaMask) is your Hyperliquid account. It holds your funds and is the only wallet that can authorise agents.
- Katbot generates a separate agent wallet — a distinct key pair that has no funds of its own.
- You grant that agent wallet permission to trade on your behalf directly in Hyperliquid's interface (under the API tab). You can revoke this permission at any time.
- Katbot uses the agent key only to sign trade orders. It cannot withdraw funds, transfer assets, or do anything outside the trading permissions you granted.
This means that even if something were to go wrong with Katbot, the worst-case exposure is limited to open trading positions — your main wallet and its funds remain entirely under your control.
Katbot.ai Never Stores Your Keys
Katbot.ai does not store, transmit, or have access to your agent private key at any time. It is never sent to our servers.
Your agent private key lives exclusively in your browser's local storage on your own device. When Katbot needs to sign a trade, the key is read directly from your browser and attached to the API request as a secure header — it goes directly from your browser to Hyperliquid, bypassing Katbot's servers entirely.
This is a deliberate architectural decision. It means:
- No Katbot employee or system can access your key.
- A breach of Katbot's servers would not expose your agent key.
- You are fully in control of your key and can delete it from your browser at any time.
The Consequence: Keys Must Be Imported Into Each Browser
Because the key is stored locally in your browser and never on our servers, Katbot has no way to automatically restore your key in a new browser. If you open Katbot in a different browser — such as MetaMask's built-in browser on mobile, a different Chrome profile, or an incognito window — the key will not be there.
This is not a bug. It is the security model working correctly. The solution is a one-time manual import of your key into each new browser you want to use. See the Managing Your Agent Key Across Browsers section below for step-by-step instructions.
Creating a Hyperliquid Portfolio
Katbot uses a step-by-step wizard to guide you through creating a Hyperliquid portfolio. The wizard has four steps:
- Portfolio Info — name your portfolio, choose testnet or mainnet, and select an AI agent
- Agent Wallet Setup — configure the agent wallet that will execute trades on your behalf
- Approve Builder Fee — sign a MetaMask message to authorise the Katbot automation fee
- Setup Complete — your portfolio is ready to trade
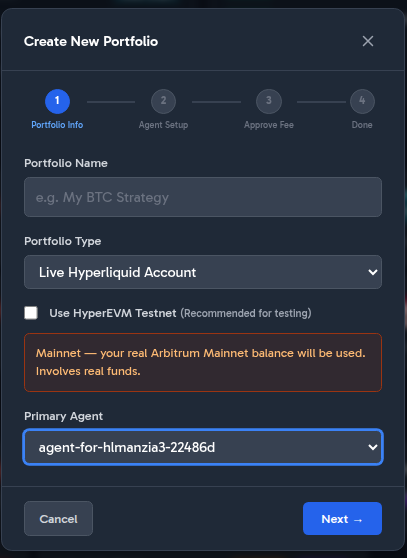
Step 1: Portfolio Info
Click the Create button in the portfolio toolbar to open the wizard.
Fill in the following fields:
- Portfolio Name — a descriptive name for your portfolio (e.g. "HL_TN_FB2")
- Portfolio Type — select Live Hyperliquid Account
- Use HyperEVM Testnet — check this box to use the Hyperliquid testnet environment for risk-free testing (recommended for your first portfolio). When unchecked, a warning reminds you that real funds will be used on Arbitrum Mainnet.
- Primary Agent — select one of your existing Katbot AI Agents to power trading recommendations for this portfolio. If you haven't created an agent yet, visit the Agents guide first.
Click Next → to proceed.
Step 2: Agent Wallet Setup
In this step you configure the agent wallet that Katbot will use to sign trade orders on Hyperliquid.
You have two options:
Option A: Use Generated Key (Recommended)
Katbot automatically generates a fresh agent wallet for you. The wizard displays the Agent Address — copy it using the clipboard button.
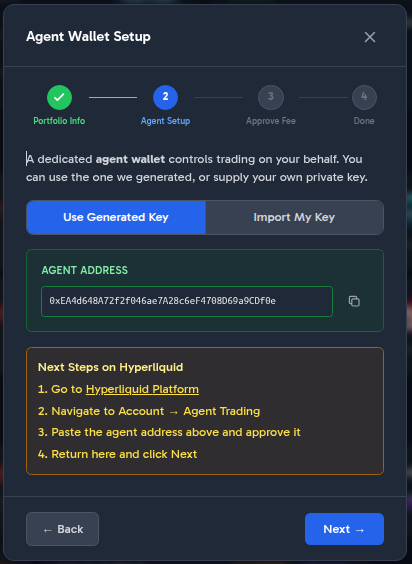
Option B: Import My Key
If you already have an agent wallet you want to use, click Import My Key and paste the private key (a 0x-prefixed 66-character hex string). The key is stored only in your browser's local storage and is never sent to any server.
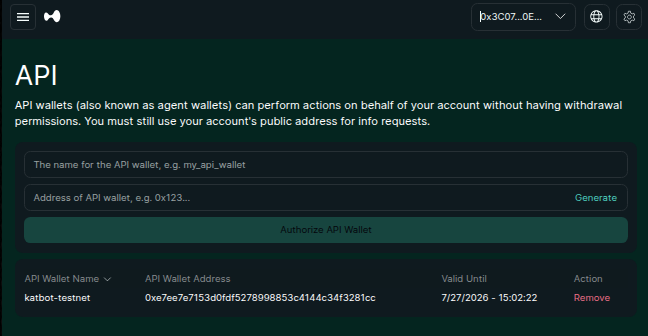
Approve the Agent on Hyperliquid
Before clicking Next →, you must approve the agent address on the Hyperliquid platform:
- Go to Hyperliquid Testnet (or Mainnet if using mainnet)
- Navigate to Account → Agent Trading (also called the API tab)
- Enter a name for the API wallet (e.g. "katbot-agent")
- Paste the Agent Address from the wizard into the address field
- Set the trading period (e.g. 180 days)
- Click Authorize API Wallet
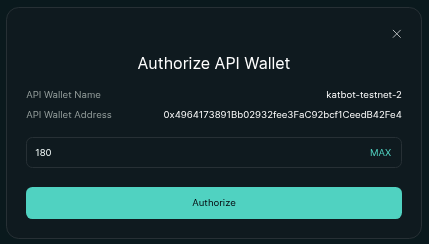
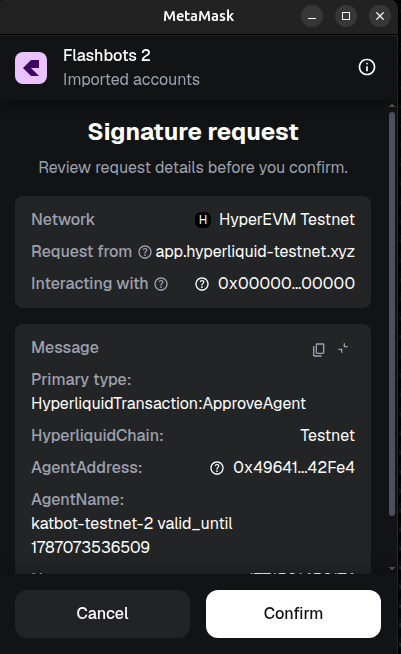
Confirm the MetaMask transaction to add the API wallet to your Hyperliquid account.
You should see the API wallet listed in your Hyperliquid account with trading permissions.
Return to the Katbot wizard and click Next →.
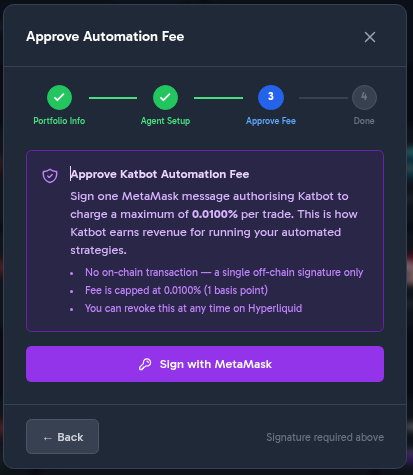
Step 3: Approve Builder Fee
The builder fee is a small automation fee that Katbot charges per trade. This is how Katbot earns revenue for running your automated trading strategies.
Key details:
- Fee rate: Maximum of 0.0100% (1 basis point) per trade
- No on-chain transaction — this is a single off-chain EIP-712 signature only
- Revocable — you can revoke this approval at any time on Hyperliquid
Click Sign with MetaMask to open the MetaMask signature dialog.
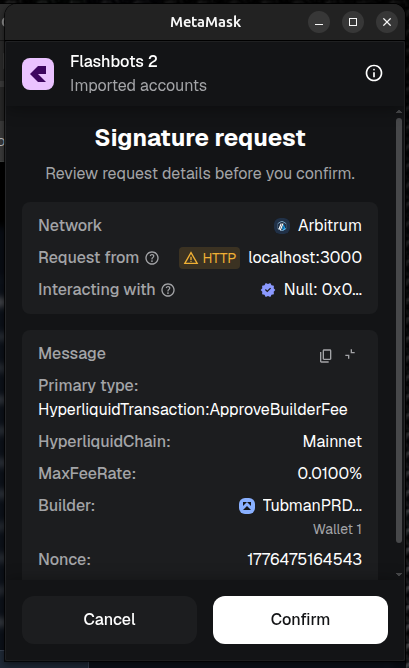
Review the signature details in MetaMask:
- Primary type:
HyperliquidTransaction:ApproveBuilderFee - MaxFeeRate:
0.0100% - Builder: the Katbot builder address
Click Confirm in MetaMask to approve.
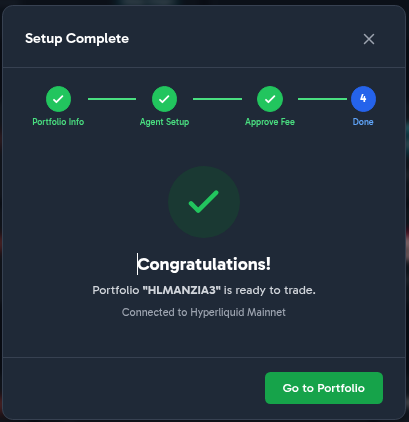
Step 4: Setup Complete
Once the builder fee is approved, the wizard shows a congratulations screen confirming your portfolio is ready to trade.
Click Go to Portfolio to navigate to your new portfolio on the dashboard.
Creating a Paper Trading Portfolio
Paper trading portfolios use Katbot's built-in Hyperliquid simulator — no real funds are involved and no wallet connection is required.
The wizard for paper portfolios is simplified to two steps:
- Portfolio Info — enter a name, select Paper Trading (Hyperliquid Simulator), set an initial balance amount, and optionally select a Primary Agent
- Setup Complete — your paper portfolio is ready immediately
Paper portfolios are a great way to test strategies and familiarise yourself with the platform before committing real capital.
Debugging Hyperliquid Integration
If you are having issues with Hyperliquid integration, please follow these steps to troubleshoot:
- Ensure that you have created a Hyperliquid portfolio in Katbot and received an "Agent Private Key" and "Agent Address".
- Verify that you have added the "Agent Address" to your Hyperliquid account as an "API Wallet" with trading permissions.
- Check the API Wallet permissions in your Hyperliquid account to ensure that the key has not expired.
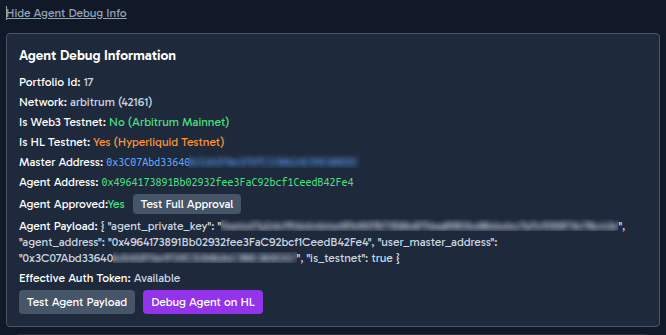
- Look at the Katbot "Show Agent Debug Info" (see below) to check the connectivity of the agent to the Hyperliquid API and check for any error messages.
- If you are still having issues, please contact our support team for assistance by going to the support channel on Discord.
Common Issues
$0 Balance Displayed
If you are using a Hyperliquid unified account, your USDC balance lives in the spot clearinghouse. The perp clearinghouse will show $0 when you have no open perp positions — this is normal. Your spot USDC is automatically used as margin when orders are placed.
Getting Test USDC for Testnet
Visit the Hyperliquid testnet faucet to get free test USDC. Go to app.hyperliquid-testnet.xyz, connect your wallet, and use the faucet feature to fund your testnet account.
"Vault not registered" Error
This error occurs when the Hyperliquid client is misconfigured. It typically means the system is incorrectly using a vault_address parameter. This is a known configuration issue — please contact support on Discord so the team can investigate.
Managing Your Agent Key Across Browsers
Why Your Agent Key May Be Missing
Your Hyperliquid agent private key is stored in your browser's local storage — it never leaves your device and is never sent to Katbot's servers. This keeps it secure, but it also means the key is tied to the specific browser you used when you first set up the portfolio.
The most common scenario where this causes problems:
| Situation | What happens |
|---|---|
| Set up portfolio in Chrome on desktop | Key is stored in Chrome's local storage |
| Open Katbot in MetaMask's built-in browser | Key is not there — MetaMask has its own isolated storage |
| Open Katbot in a different Chrome profile | Key is not there — each profile has separate storage |
| Open Katbot in incognito / private mode | Key is not there — private mode clears local storage on close |
| Return to the original browser | Key is still there — no action needed |
This is normal browser security behaviour. The fix is a one-time import of your key into each new browser you want to use.
Step 1 — Recognising the Problem
When Katbot cannot find your agent key in local storage, it will show a warning on the portfolio panel:
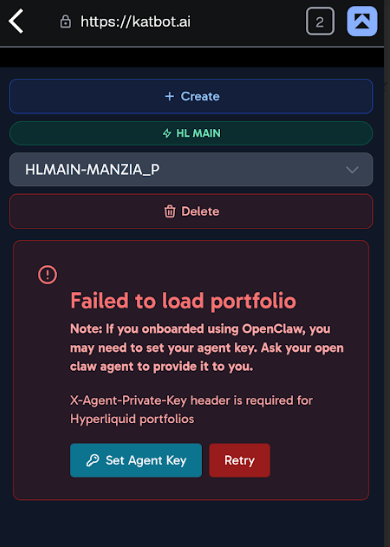
You will also see a "Set Agent Key" button. Click it to open the import modal.
Step 2 — Entering Your Agent Key
The import modal asks you to paste your agent private key (a 0x-prefixed 66-character hex string). This is the same key that was generated when your portfolio was first created — if you used OpenClaw or the API to create the portfolio, your key was provided at that time.
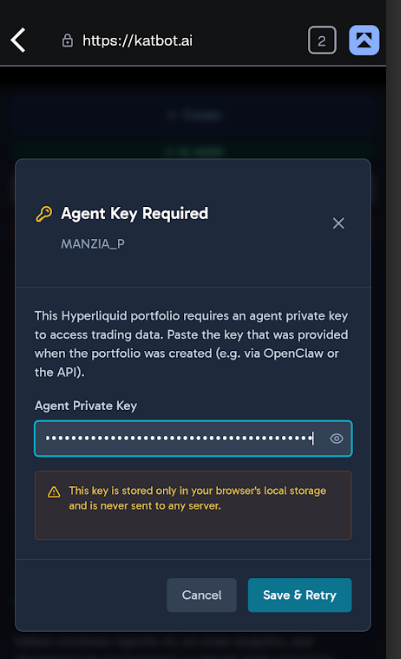
Paste the key into the field and click Save & Retry. Katbot will: 1. Store the key in this browser's local storage 2. Retry the portfolio data fetch automatically 3. Update the Agent Debug panel to confirm the key is set
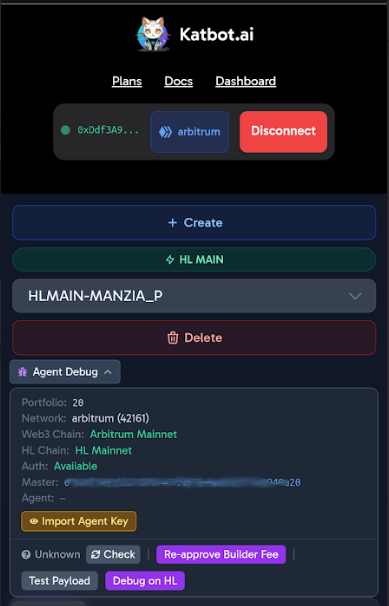
Step 3 — Confirming the Key is Set
After saving, the portfolio will load and the Agent Debug panel will show your agent address and key status:
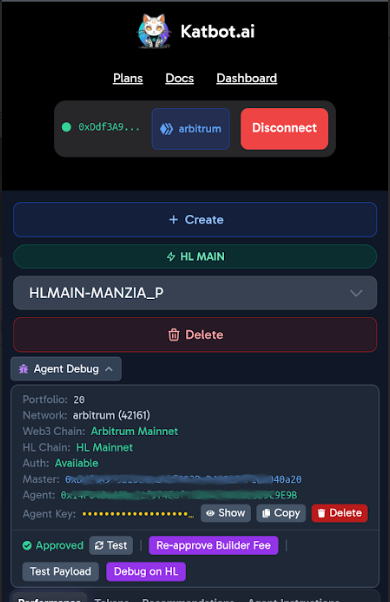
You only need to do this once per browser. The key persists in local storage and will be available the next time you open Katbot in the same browser.
Exporting Your Key to Another Browser
If you need to use Katbot in a different browser (e.g. moving from Chrome desktop to MetaMask mobile), you need to transfer your key. The safest way is to copy it from the Agent Debug panel in your original browser.
- Open the Agent Debug panel by clicking Agent Debug in the portfolio toolbar.
- Click Show to reveal your key, then click Copy to copy it to the clipboard.
- Switch to the new browser and open Katbot.
- When the missing key warning appears, click Set Agent Key, paste the key, and save.
Keep your agent private key secure. Anyone with this key can execute trades on behalf of your portfolio. Do not share it, do not paste it into untrusted websites, and do not store it in plain text.
Resetting Your Agent Key (for Testing or Troubleshooting)
If you need to test the import flow or clear a bad key, the Agent Debug panel has a Delete button next to the key row. Clicking it removes the key from local storage and resets the panel to the import state, so you can verify the full import workflow works correctly.