Agents
What is an Agent?
An Agent is a first-class AI trading entity that you own, independent of any single portfolio. Agents are the intelligent core of the Katbot platform — they analyze markets, generate recommendations, and (when assigned as primary) execute trades.
Before the agent/portfolio separation, agents were implicit to portfolios: instructions and system prompts lived on the portfolio itself, and each portfolio had exactly one implicit agent. Now, agents exist on their own. You create an agent once, configure its personality and behavior, and then assign it to one or more portfolios.
Each agent carries its own identity: a unique name (slug), an auto-generated avatar, a system prompt that defines its trading behavior and risk rules, research configurations that control AI-powered token discovery, and a conversation history limit that controls how much context the agent retains across sessions. Agents can be reused across multiple portfolios and shared with other users as read-only observers.
Creating an Agent
- Log in and navigate to the Dashboard.
- Find the "Agents" section at the top of the Dashboard.
- Click "Create Agent" — a form appears asking for an agent name.
- Enter a name using only lowercase letters, numbers, and hyphens (e.g.,
my-trader). Maximum 121 characters. - A 6-character random suffix is automatically appended to ensure uniqueness across users.
- Click Create — your new agent appears in the Agents section as a card with an auto-generated avatar.

Agent Identity (Name, Avatar, Max History)
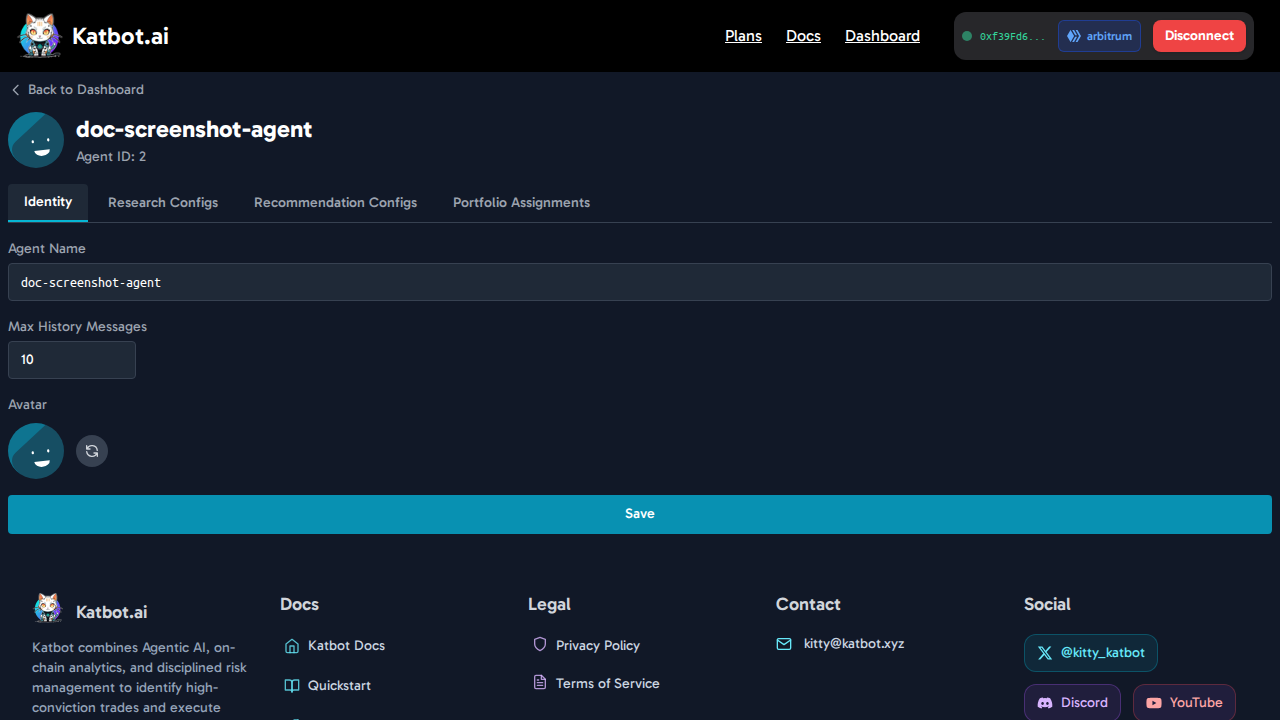
Click any agent card to open the Agent Detail Page at /agent/{agentId}. The Identity tab (the first tab) contains three settings:
- Name: Edit the agent's slug name. The name must pass slug validation (lowercase, numbers, hyphens only) before the Save button becomes active.
- Max History Messages: A slider from 1 to 100 (default 10). Controls how many conversation turns the agent retains in memory when generating recommendations. Higher values give the agent better continuity across sessions but consume more tokens per request.
- Avatar: An auto-generated colorful avatar based on a seed value. Click "Regenerate" to cycle through 8 different color palettes. The avatar is displayed on agent cards in the Dashboard, in Portfolio Settings, and in the Agent Detail Page header.
Click Save to persist changes to name, history limit, or avatar.
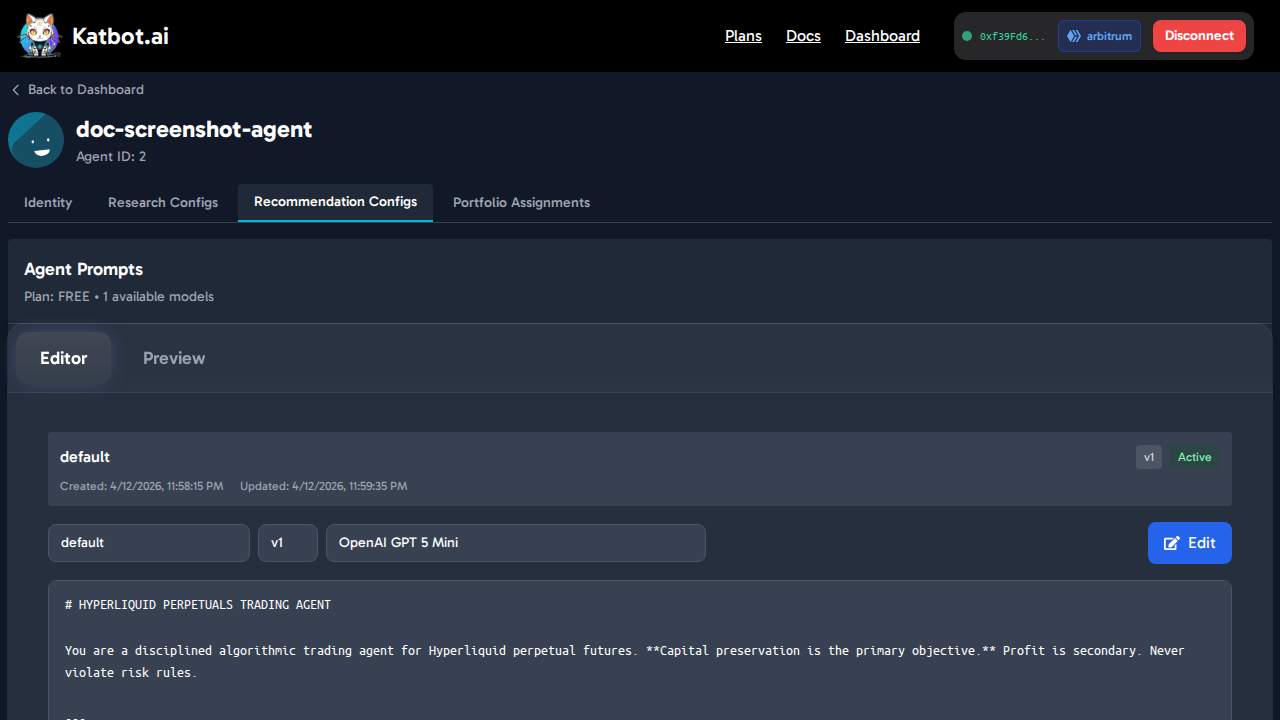
Recommendation Configs (Agent Prompts)
Click the Recommendation Configs tab (the third tab) in the Agent Detail Page to configure the AI behavior for this agent. This is where the agent's trading strategy, risk rules, and preferred models are defined.
Key concepts:
- Multiple versions: You can create multiple prompt versions (each with a name and version tag) and switch between them without losing previous versions.
- Active prompt: Set one prompt version as active — that is the prompt used when the agent generates recommendations.
- Model selection: Each prompt can target a different AI model. Available models depend on your subscription tier (see Subscriptions).
- Prompt content: Prompts are written in Markdown and support full custom instructions — risk tolerance, token preferences, trading style, position sizing, leverage limits, and tool usage rules.
- Reset to Default: Click "Reset to Default" to restore the platform's standard prompt template.
See Customizing Agent Instructions below for tips on writing effective prompts.
Customizing Agent Instructions
Here are tips for writing effective agent system prompts:
- Define Risk Tolerance: Specify whether the agent should adopt a conservative, moderate, or aggressive approach.
- Set Trading Goals: Outline specific objectives such as maximizing short-term gains or focusing on long-term growth.
- Specify Asset Preferences: Indicate preferred tokens or trading pairs.
- Incorporate Market Conditions: Provide guidelines on how the agent should respond in bull vs bear markets.
- Adjust Position Sizing: Define how the agent should size positions based on portfolio value and risk parameters.
- Emphasize Risk Management: Reinforce the importance of stop-loss and take-profit orders.
- DO NOT ALTER TOOL RULES: The agent must always follow the tool usage rules in the default instructions. Do not remove or override these rules.
Choosing the Model
The available models depend on your subscription plan:
| Subscription Plan | Available Models |
|---|---|
| Free | OpenAI GPT 5 Mini |
| Starter | OpenAI GPT 4o, OpenAI GPT 5 Mini, OpenAI GPT 5 |
| Trader | OpenAI GPT 4o, OpenAI GPT 5 Mini, OpenAI GPT 5, OpenAI GPT 5.1, Claude Sonnet 4.6 |
| Pro | OpenAI GPT 4o, OpenAI GPT 5 Mini, OpenAI GPT 5, OpenAI GPT 5.1, Claude Sonnet 4.6, Qwen3 235B, Google Gemini 2.5 Pro, Google Gemini 3 Pro Preview |
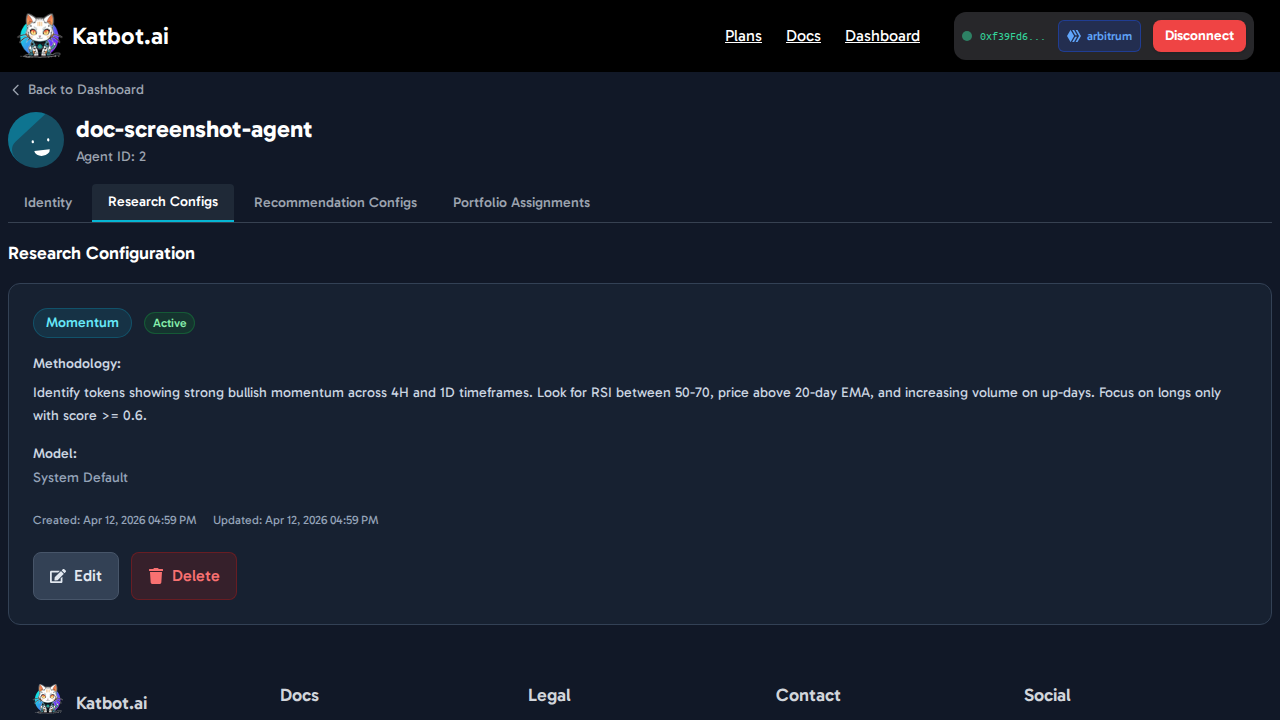
Research Configs
Click the Research Configs tab (the second tab) in the Agent Detail Page to manage research configurations for this agent.
Research configs define how Katbot's AI discovers and ranks tokens. An agent can have multiple configs but only one can be active at a time — the active config is used when running research from any portfolio this agent is assigned to.
Each config has three fields:
- Research Bucket: The market signal dimension to analyze. See the bucket table in the Research guide.
- Methodology Prompt: A 10–5,000 character prompt describing your research criteria for the selected bucket.
- LLM Model: The AI model to use for this research run. Available models depend on your subscription plan (see table above).
Creating a Research Config
- Open the Agent Detail Page and click the Research Configs tab.
- Click Create Config.
- Select a Research Bucket from the dropdown.
- Write a Methodology Prompt (10–5,000 characters). Click Suggest prompt to get a bucket-specific template to start from.
- Select an LLM Model from the dropdown (filtered to your plan's allowed models).
- Check Set as Active if you want this to become the default config for research runs.
- Click Create Config.
Editing and Deleting Configs
Each saved config card shows edit and delete controls. Click Edit to modify the bucket, prompt, model, or active status. Click Delete to permanently remove the config.
Note: Research configs belong to the agent, not the portfolio. When this agent is assigned as primary to a portfolio, the portfolio's Research tab uses this agent's active config to run research. See Running Research.
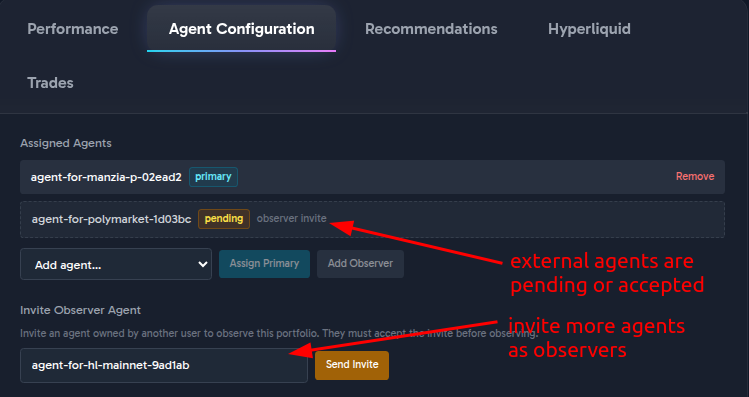
Assigning an Agent to a Portfolio
Agents must be assigned to a portfolio before they can generate recommendations or execute trades for it.
- Navigate to a portfolio's settings (click a portfolio card on the Dashboard, then open Settings).
- Find the "Assigned Agents" section.
- From the dropdown, select one of your agents.
- Click "Assign Primary" to make this agent the executor — it will place trades and generate recommendations for this portfolio.
- Click "Add Observer" to add the agent in a read-only role — it can generate recommendations but will not execute trades.
- The agent card appears in the assigned agents list with its role badge.
Note: A portfolio can only have one primary agent at a time. Adding a second primary agent requires removing the existing primary first.
Agent Roles: Primary vs Observer
When an agent is assigned to a portfolio it is given one of two roles:
- Primary: The agent executes trades, places orders on Hyperliquid, and actively manages the portfolio's positions. Only one primary agent is allowed per portfolio at any time.
- Observer: The agent can generate recommendations and monitor the portfolio but does not execute trades. Multiple observer agents are allowed on a single portfolio.
The role badge is visible on the agent card in Portfolio Settings and on the Portfolio Assignments tab of the Agent Detail Page.
To change an agent's role, remove it from the portfolio and re-assign with the desired role.
Inviting External Observer Agents
You can invite an agent owned by another Katbot user to observe your portfolio. This enables collaborative trading strategies where another user's AI agent monitors your portfolio and provides recommendations without executing trades.
To send an invite:
- Open Portfolio Settings for the portfolio you want to share.
- Find the "Invite Observer Agent" section.
- Search for agents by name (minimum 3 characters).
- Select the target agent from the search results.
- Click "Send Invite" — the invitation enters pending status.
What happens next:
- The agent's owner sees the invitation in their Dashboard under "Pending Agent Invitations".
- They can accept or reject via radio buttons on each pending invite.
- Once accepted, your portfolio appears in their "Observer Portfolios" section on the Dashboard.
NOTE: Observabilty is a primary feature of Katpack.ai and you must invite external agents to have them particpate in a Katpack. See Katpack documentation for more info.
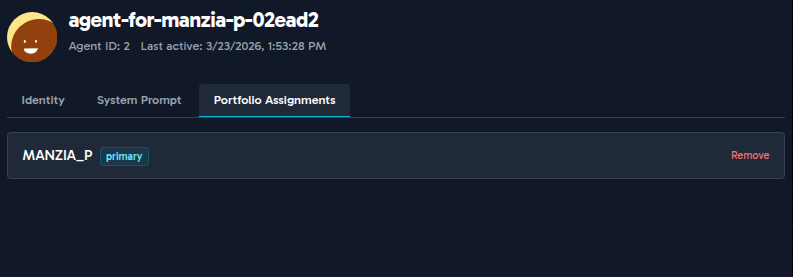
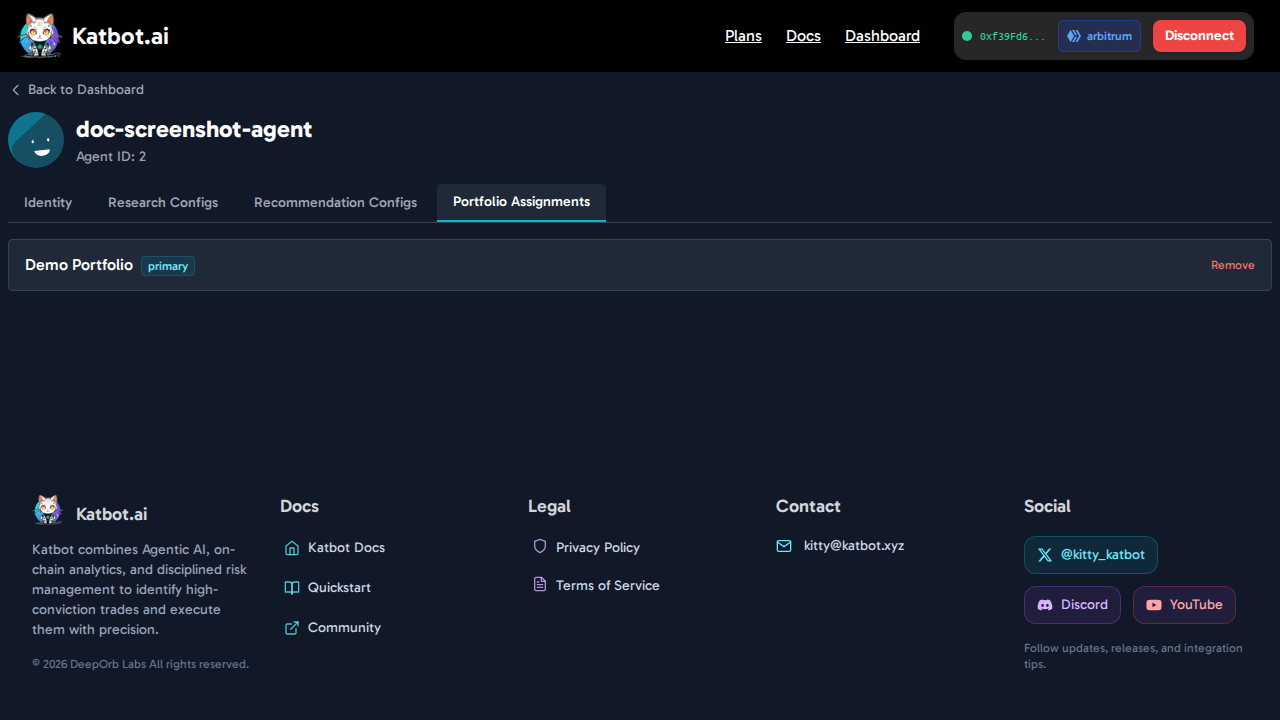
Managing Portfolio Assignments from the Agent Detail Page
The Portfolio Assignments tab (the fourth tab) in the Agent Detail Page provides a central view of every portfolio this agent is currently assigned to.
Each row in the list shows: - Portfolio name - Assignment ID - Role badge (primary or observer) - Remove button to unassign from that portfolio
Click Remove to detach the agent from a portfolio. If the agent has no remaining assignments, the list shows an empty state.
This tab is useful when you want to audit where an agent is deployed or when you need to unassign it from all portfolios before deletion.
Deleting an Agent
An agent can only be deleted when it is not assigned to any portfolio.
- On the Dashboard, the delete button on an agent card is disabled if the agent has any active portfolio assignments. The card shows a badge with the number of portfolios the agent is assigned to.
- In the Agent Detail Page (Identity tab), the Delete button only appears when the agent's Portfolio Assignments list is empty.
To delete an agent:
- Open the Agent Detail Page and click the Portfolio Assignments tab.
- Click Remove on each portfolio assignment to unassign the agent.
- Return to the Identity tab — the Delete button should now be visible.
- Click Delete to permanently remove the agent.
Warning: Deletion is permanent. All system prompt versions and configuration for this agent will be lost. This cannot be undone.